Showing posts with label using. Show all posts
Showing posts with label using. Show all posts
Monday, October 7, 2013
How to Save 4 3 3 4 2 8 SHSH iPhone iPod Touch iPad Using TinyUmbrella 04 33 00
TinyUmbrella 4.33.00 has released to allow you to save iOS 4.3.3 on iPhone 4, 3GS, iPod touch 4G, 3G and iPad, also TinyUmbrella 4.33.00 allows you to save SHSH for Verizon iPhone 4 running iOS 4.2.8.
Read More..
Sunday, October 6, 2013
How to Jailbreak Your iPad 1 Using RedSn0w Windows 5 0b4
These are instructions on how to jailbreak your iPad 1 on the 5.0b4 firmware using RedSn0w for Windows. Since iOS 5.0 has not yet been released these are instructions for developers only. This procedure will not hacktivate so you must have your UDID registered with a developer, and it is tethered.
If you want to jailbreak a lower firmware version you can find the appropriate tutorial here.
Step One
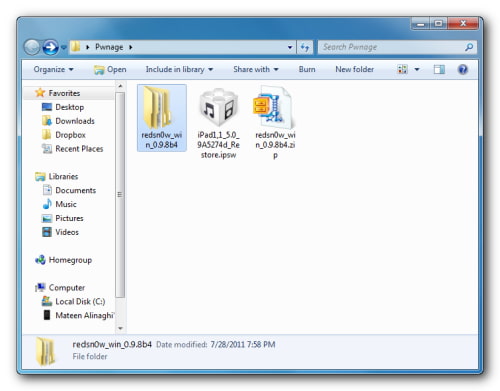
Create a folder on your desktop called Pwnage
Download RedSn0w from here and place it in the Pwnage folder. Likewise, download the latest 5.0 firmware from iOS Dev Center and place it in the same folder.
5.0b4 (iPad 1): iPad1,1_5.0_9A5274d_Restore
Extract the RedSn0w zip file into the same folder.
Step Two
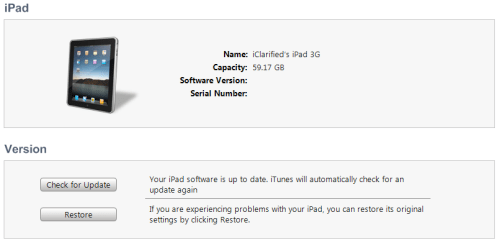
Connect your iPad to the computer and launch iTunes.
Select your iPad from the list of devices on the left. Now hold down Shift and click the Restore button. Restore is preferred as it wont create any wasted space on your iPad.
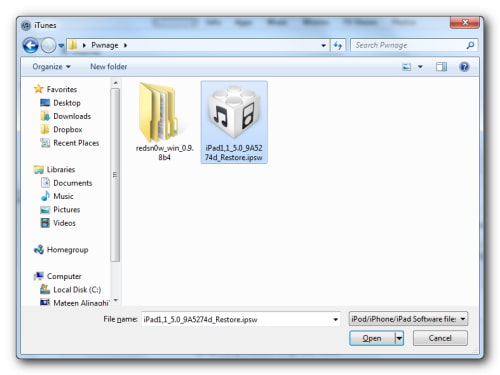
Navigate to the Pwnage folder on your desktop and select the 5.0 firmware ipsw. Click the Choose button to continue.
Step Three
Once iTunes has finished updating your iPad to the desired firmware open the Pwnage folder on your desktop and launch the redsn0w application from the redsn0w folder we extracted earlier.
**Windows 7 users may need to run RedSn0w in Vista Compatibility mode. You can do this by right clicking the executable and selecting Properties from the contextual menu.
Step Four
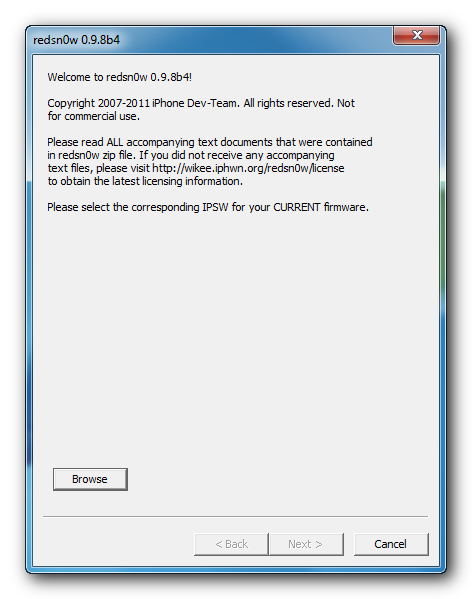
Once RedSn0w opens click the Browse button
Step Five
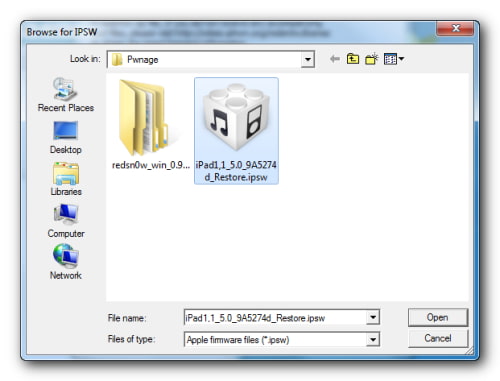
Select the 5.0 firmware ipsw we placed in the Pwnage folder on our desktop then click Open.
Step Six
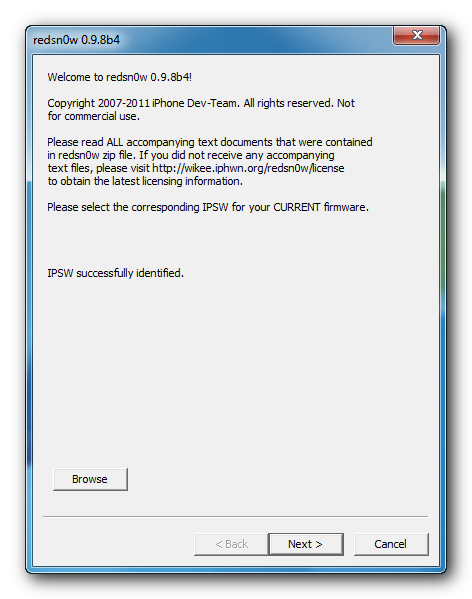
Once the firmware has been verified click the Next button to continue.
Step Seven
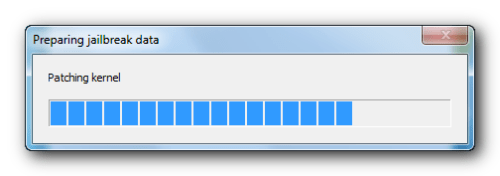
RedSn0w will now prepare the jailbreak data
Step Eight
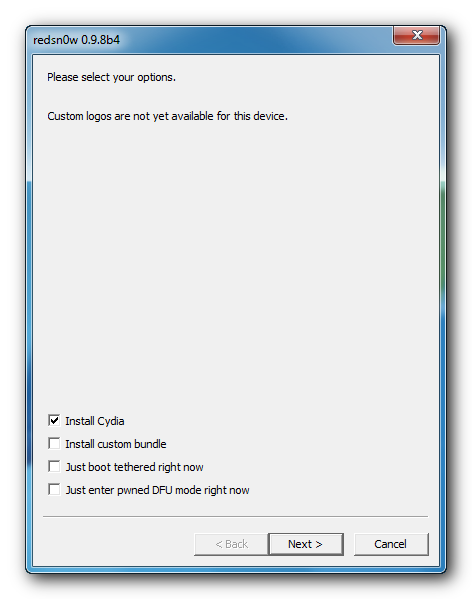
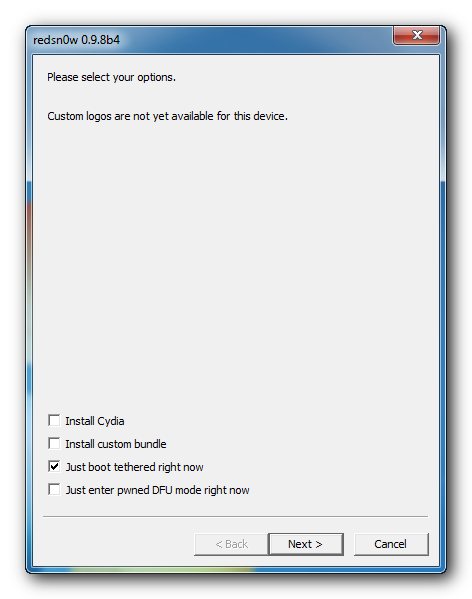
From this window you can select the jailbreak options you would like. Make sure Cydia is selected and click the Next button to continue.
Step Nine
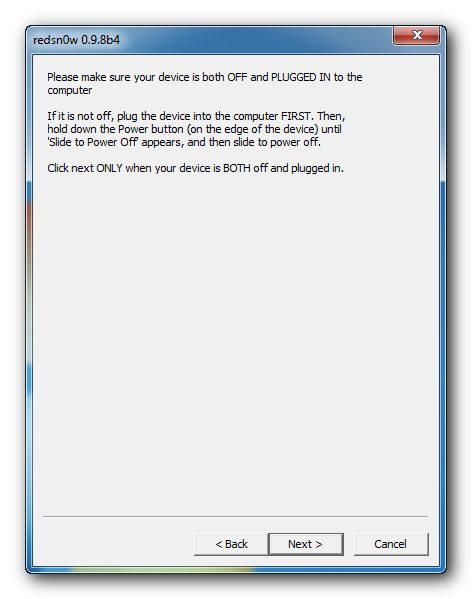
Please plug your iPad into the computer and make sure its OFF then click the Next button
Step Ten
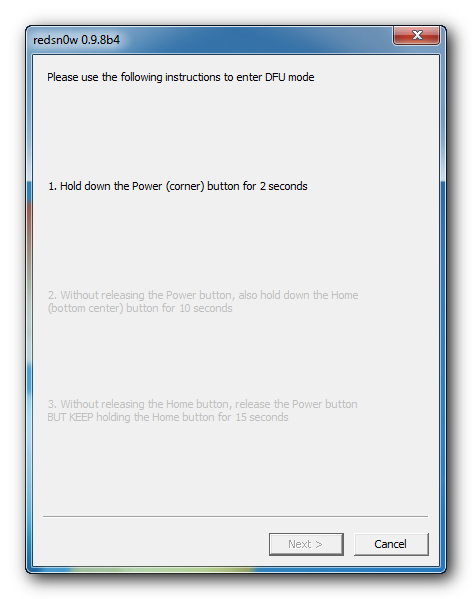
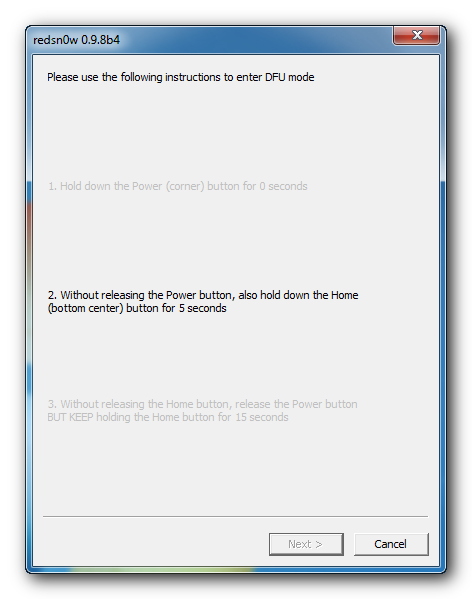
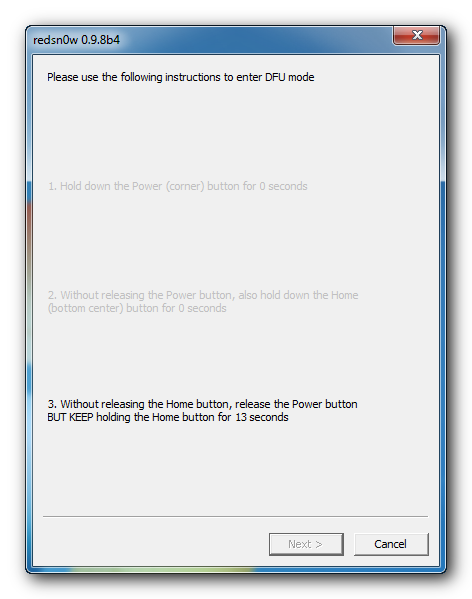
RedSn0w will now guide you through the steps to get into DFU mode. You can find more help with DFU mode here
Hold down both the Home button and the Power button for 10 seconds.
Release the Power button and continue holding the Home button until RedSn0w detects the device.
Step Eleven
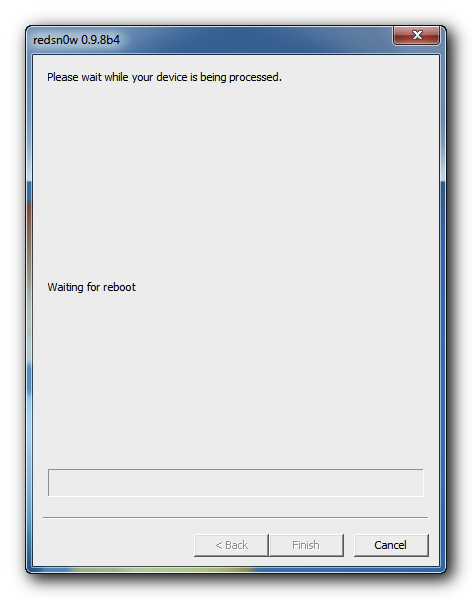
Your iPad will now reboot
Step Twelve
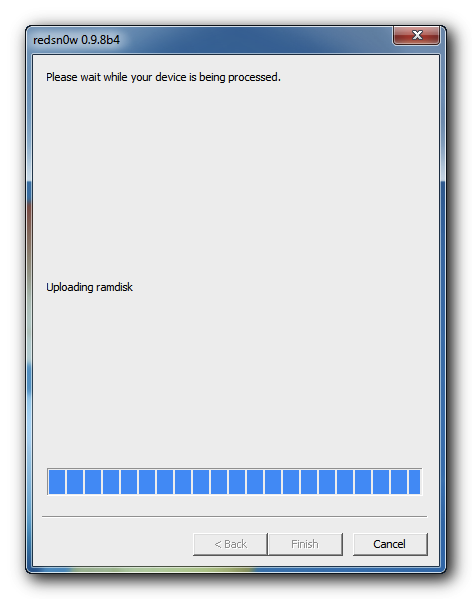
RedSn0w will then begin uploading the new RAM Disk and Kernel.
Step Thirteen
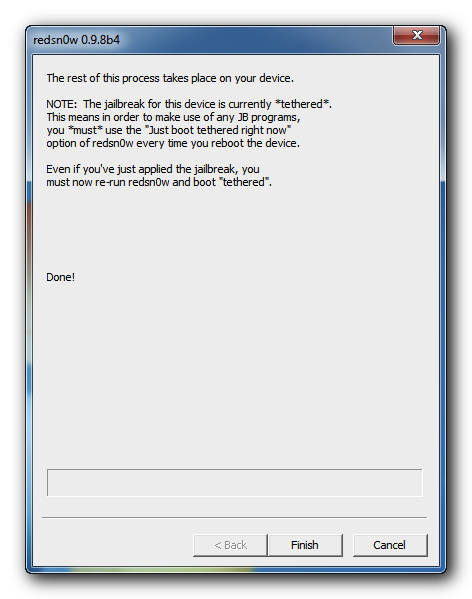
Once this is complete you will be notified that RedSn0w is done. Click the Finish button. When your iPad finishes rebooting (5 minutes or so) it will be jailbroken with Cydia on the SpringBoard.
BOOT TETHERED:
Since this is a tethered jailbreak you must use Redsn0w to help you boot back into your jailbroken device if its powered off for any reason. Simply connect your iPad to the computer, launch RedSn0w, select Just boot tethered right now from the options window and click Next to have RedSn0w boot your device.
*As usual a big thanks to the iPhone Dev-Team and Geohot for their hard work and contribution to the iPhone community.
**Windows 7 users can try running RedSn0w as an administrator in Windows Vista or XP compatibility mode if you experience any difficulties.
How to Downgrade Your iPhone Firmware Using TinyUmbrella Mac
These are instructions on how to downgrade your iPhone firmware using TinyUmbrella. In order to follow this tutorial you must already have saved your SHSH Blobs for the firmware you want to restore to.
You can use this tutorial to downgrade to iOS 4.3.3 in order to jailbreak using JailbreakMe. The Windows version of this tutorial is here.
Step One
Download and install TinyUmbrella from here if you havent already.
Step Two
Download the firmware you want to restore to from here and save it in a Pwnage folder on your desktop. Remember you must have saved your SHSH Blobs for this firmware already.
Step Three
Launch TinyUmbrella from your Applications folder.
Step Four
Connect your device and make sure it lists saved SHSH Blobs for the firmware you are restoring to. If you dont see any blobs you may need click the Save SHSH button to load them from Cydia.
Step Five
Click the Start TSS Server button.
*Do not continue if TinyUmbrellas TSS server is not started successfully.
Step Six
Launch iTunes by clicking its icon in the dock.
Step Seven
Place your iPhone into DFU mode by holding down the Power and Home buttons for 10 seconds then release the Power button and continue holding the Home button for another 10 seconds.
You can find help with DFU mode here.
Step Seven
Select your iPhone from the list of devices on the left, hold down the Option key and click Restore.
Step Eight
Navigate to the Pwnage folder on your desktop, select the ipsw file you downloaded and click the Open button.
Step Nine
iTunes will now restore to the lower firmware version.
Step Ten
If you happen to get an Error 1 or you get stuck in recovery mode, you will need to use FixRecovery to get your device out of recovery mode.
Download FixRecovery from here and save it to the Pwnage folder on your desktop. Double click to extract the archive.
Step Eleven
Place your iPhone into DFU mode by holding down the Power and Home buttons for 10 seconds then release the Power button and continue holding the Home button for another 10 seconds.
You can find help with DFU mode here.
Step Twelve
Double click to launch the fixrecovery43 executable from the fixrecovery-osx folder we just extracted.
Step Thirteen
FixRecovery will perform its magic after which your device will be successfully rebooted.
IMPORTANT:
● If fixrecovery does not work the first time you may need to rerestore to your desired firmware version and try again. Remember to keep the TSS Server running during your second restore as well.
● This tutorial does work to get your from iOS 5 beta back down to iOS 4. Although some have reported less issues with a lower version of iTunes this tutorial was tested to work with iTunes 10.5b77.
Saturday, October 5, 2013
AppleTV How to Jailbreak Your Apple TV 2G Using Seas0nPass Windows 5 0 2
| ||||||||||
Sunday, September 29, 2013
Jailbreak iOS 5 On iPhone 4 3GS iPod Touch 4G And iPad 1 Using Redsn0w 0 9 9b5
Phone-Dev team has just released an updated version of redsn0w, redsn0w 0.9.9b5 to jailbreak iOS 5 final version for on iPhone 4, iPhone 3GS, iPod Touch 4G, and iPad 1. Redsn0w 0.9.9b5 bring a new “Custom IPSW” feature which can be used to create custom IPSW (pre-jailbroken) file, this feature will also preserve your baseband so that your can unlock your device later on. 
This new “Custom IPSW” feature works for iPhone 4 and iPhone 3GS for now but it will be expanded later on. Redsn0w 0.9.9 b5 is currently available for Mac OS only but a Windows version will be released very soon.
Release Notes of Redsn0w 0.9.9b5:With today’s official iOS5 release, redsn0w has been updated to 0.9.9b5 to include the public URLs for the IPSW files. This way, first-time iOS5 jailbreakers don’t need to supply the IPSW file manually. It’s still a tethered jailbreak on all except the old-bootrom iPhone3GS, and it doesn’t apply to iPad2 or the upcoming iPhone4S.Remember: If you rely on unlock DO NOT jailbreak directly using redsn0w, you need to create a custom IPSW and restore it manually in order to preserve baseband. On windows you can use Sn0wbreeze 2.8b8 to create (pre-jailbroken) IPSW file with baseband preserved.
Because the jailbreak is currently only tethered for most devices, we’re not going to release a new PwnageTool yet. Instead, we’ve decided to build some of PwnageTool’s functionality into redsn0w (since you need redsn0w to “Just boot tethered” on every power cycle anyway). The new “Custom IPSW” button on the Extras screen will create a custom IPSW without the baseband update for 4.3.3 or 5.0gm (iPhone3GS and iPhone4 only, for now). Remember to NOT accidentally restore to the stock IPSW after you create the custom one! The custom one begins with NO_BB_ (for “no baseband”). On Mac iTunes, you select an IPSW by holding down the Option key while clicking “Restore”.
You must enter “Pwned DFU” mode before trying to use the NO_BB_ IPSW with iTunes (and your hosts file cannot be pointing to Cydia’s servers due to the new blob nonce mechanism they’re using in iOS5).
Version 0.9.9b5 is available only for Mac for now, until we can do more testing on the Windows version of “Custom IPSW”.
We’re currently working on a normal compatibility update for existing ultrasn0w unlockers. After that we’ll try to fix the iBooks issue on jailbroken iOS5.
How To Jailbreak With Redsn0w 0.9.9b5:
Step 1: Connect your iPhone to the computer and launch iTunes.
Step 2: Select your iPhone from the list of devices on the left. Now hold down Option and click the Restore button. Restore is preferred as it won’t create any wasted space on your iPhone.
(You can skip this step if iOS 5 is already installed on your device)Step 3: Download (link) and Launch the redsn0w 0.9.9b5 for Mac OS
Step 4: Once RedSn0w opens click the Jailbreak button
Step 5: Plug your iPhone into the computer and make sure its OFF then click the Next button. RedSn0w will now guide you through the steps to get into DFU mode.
- Hold down both the Home button and the Power button for 10 seconds.
- Release the Power button and continue holding the Home button until RedSn0w detects the device.
Your iPhone will now reboot
Step 6: RedSn0w will now prepare the jailbreak data
Step 7: Select Cydia from the list of options and click Next.Your iPhone will now be rebooted again and RedSn0w will begin uploading the new RAM Disk and Kernel.
Step 8: Once this is complete you will be notified that RedSn0w is done. When your iPhone finishes rebooting (5 minutes or so) it will be jailbroken and running iOS 5 final version.Booting In Tethered Mode:
Once you have jailbroken you will need to rerun redsn0w to boot tethered.
Step 1: From the main RedSn0w menu click the Extras button.
Step 2: Select Just boot from the Extras menu to just boot tethered.
And that was it, happy jailbreaking! If you face any problem during this process feel free to ask for any kind of help.
Subscribe to:
Posts (Atom)

